
|
|
Transferring Photos from Android's After Recent Update
Steps have changed
Keywords:
android, windows, transfer, security, language
Key Takeaway:
The process of transferring
photos from the phone to your computer has changed.
Category Insights:
ANDROID — This article covers android related developments and technology
news.
Android phones recently received an update in October 2025 to the operating system. One of the changes was some additional security. The process of transferring photos from the phone to your computer has changed. These are preliminary instructions and may be refined later.
Why?
You’re probably asking why this extra security is needed. Well, there have been
cases where people have used public chargers in airports, hospitals, restaurants, etc. These
connections may be MORE than simple chargers. Someone may be accessing the data on your
phone without your permission. The newly added security prevents this from happening without
a PIN or a thumbprint.
Part 1 - Connect your USB cable
Connect the USB cable that works with your charger to your computer as you normally would. This can be a USB-C to USB-A cable. Or a USB-C to USB-C cable. Either one works. You'll hear the normal tone to indicate the connection has been made to the computer.
Part 2 - Phone Settings
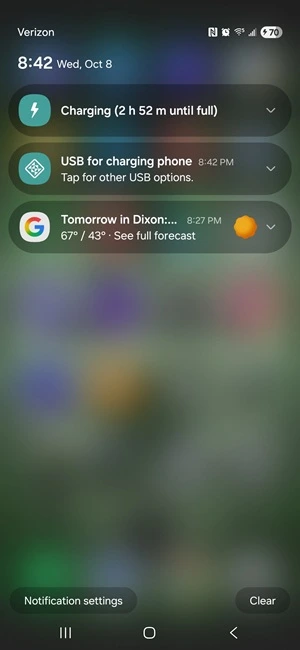
- On your phone, you will get a USB notification. This is new. Pull the main screen
down to view your notifications. Select the notification that says USB FOR
CHARGING PHONE as shown below. You will need to enter your PIN or
thumbprint.
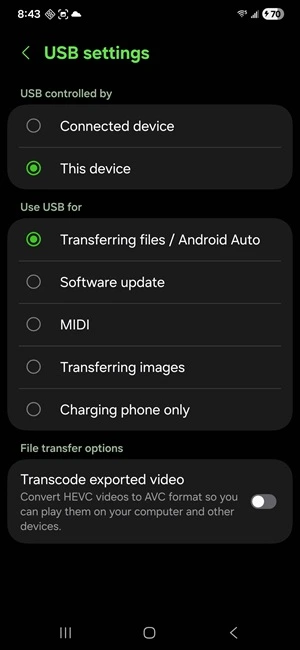
- Select the option for TRANSFERRING FILES / ANDROID AUTO as shown
below. This will grant access to the memory card in your phone.
These screen shots are from a Samsung Galaxy S24+. Your screen may be somewhat different, but the steps will likely be similar.
Part 3 - Open File Explorer
Open File Explorer on your Windows computer. The icon will look something
like one of these depending on what version of Windows you're using.
Browse to the DCIM folder. This is where all of your files are stored. You may
have sub folders for Downloads, Camera, Facebook, X or other social media sites. You can now
Copy, Move or Delete photos, PDF files and other documents as you did before the update.